Macintosh Serial Port Connections
David P. Goldenberg
December 2002
Note: This document is also available as a pdf file (Adobe Acrobat).
Contents
1 Introduction1.1 Disclaimer
1.2 First Steps
1.3 References
2 From the Instrument side: The RS-232 standard
3 Signals, logic and voltages
4 Null modem cables and adaptors
5 The Macintosh side: An RS-422 connection
6 Connections to three spectrophotometers
6.1 UltroSpec III
6.2 Spectronic 2001
6.3 Spectronic Genesys 8
7 DB9 connectors
8 Contact Information
1 Introduction
This document is the result of my own attempts to understand the intricacies of serial port connections, especially in the context of interfacing Macintosh computers with spectrophotometers. A Macintosh application written for this purpose, MacSpec II, is available at the Goldenberg Lab web page, and the documentation provided with the program includes instructions for making connections to the currently supported spectrophotometers. This additional documentation is intended for those who might want to interface another instrument with a Macintosh or, for some other reason, would like to know more about this arcane subject.
The serial connection is one of the oldest bits of computer technology that is still with us. It was originally designed to connect computers or terminals to modems, but it has also been used to connect computers to each other, to printers and to a variety of peripheral devices including scientific instruments. The good thing about a serial connection is that it is relatively easy to write software to transmit data over it. The worst, probably, is the fact that it is one of the least standardized standards in the computer industry. Different connectors are used, and, even worse, different equipment manufacturers have different ideas about how the connector pins should be wired! Finding a cable with the right kind of connector at each end is no guarantee that it will work. The serial connection is also relatively slow by modern standards, but that is not at all a problem for this application.
To the extent that they follow any standard, most instrument manufacturers will specify that the serial port is an ``RS-232'' connection. None of the current Macintoshes have have serial ports, but there are adaptors that allow serial devices to be connected via the USB port found on the newer machines. These, and the serial ports found on older Macs, are not actually RS-232 connections, but are RS-422 ports, and use the small circular DIN-8 plug. Fortunately, the two standards are similar enough that it is usually possible to get the Mac to talk to an RS-232 device, though it may take some trial and error and some soldering.
1.1 Disclaimer
I do not have any professional credentials in computer hardware or serial interfacing. The information provided here was derived from books and the internet. I cannot accept any responsibility for damage to your computer, your instrument or your sanity. (To quote a former Vice-President of the United States, "What a terrible thing to have lost one's mind. Or not to have a mind at all. How true that is.")
1.2 First Steps
There are at least three different approaches that can be taken to figuring out how to interface a particular instrument:
- Just try it. If the manufacturer specifies that the instrument is wired as a "DCE" device, try connecting it to the computer using a Macintosh "hardware handshake cable". This is a relatively standard cable with a small round plug at one end (a male DIN-8 connector) and a 25-pin connector (a DB25 connector) at the other end. The wiring of this cable is described below. Beware that there are other cables with similar connectors that are wired differently! If the instrument has a 9-pin connector DB9), you will also need a DB25-DB9 adaptor. You may also need a "gender changer" to connect the cable to the instrument.
If the manufacturer says that the instrument is wired as a "DTE" device, try using the hardware handshake cable along with a device called a "null modem adaptor". This is a small box with DB25 connectors on each end with internal wiring that crosses some of the pins, as described below. Again, you may also need a DB25-DB9 adaptor or a gender changer.
If the manufacturer doesn't say whether the device is DCE or DTE, go ahead and try the connections described above. One of them may well work, and you will never need to know what DCE and DTE mean! This, in fact, worked for the first two spectrophotometers we tried.
- Deduce the connections from the manufacturer's specifications. The manual may include a table describing the functions of the various pins in the connector, or you may be able to obtain this information by asking the manufacturer. The manufacturer may also specify a special cable for connecting the instrument to a PC, and you may be able to deduce enough to make a connection by analyzing the wiring of this cable. Most of this document deals with trying to solve the problem using the manufacturer's specifications.
- Use a more experimental approach. If the steps above do not lead to success, it should be possible to deduce the wiring of the instrument's serial connector by making some voltage measurements under specific conditions and carrying out some simple experiments. Sources of information about how to do this are given below.
Experimenting with the serial port should be relatively safe for both the computer and the instrument, provided that you don't leave any incorrect connections for more than a few minutes. The RS-232 standard specifies that any of the pins should tolerate connection to any other pin, including a connection to the maximum voltage (15 V) or a direct short to ground. Incorrect connections can cause large current loads on the drivers, however, which can generate a lot of heat and burn something out. It is also possible that you could expose the circuits to a static discharge at a much higher voltage. Please read the disclaimer again!)
1.3 References
A web page with Macintosh-specific information on serial port connections is maintained by Charles B. Cranston:
http://www.wam.umd.edu/~zben/mac/MacSerHard.html
Though they do not deal with Macintosh-specific issues, I have found the following two pages on RS-232 connections very useful:
From CAMI Research, Inc.:
http://www.camiresearch.com/Data_Com_Basics/RS232_standard.html
From Lammert Bies:
http://www.lammertbies.nl/comm/info/RS-232.html
There are also several books devoted to serial connections. A particularly popular one that I found helpful is:
"The RS-232 Solution" by Joe Campbell and published by SYBEX, Inc.This book emphasizes the experimental approach to working out a serial connection. The book is out of print, but used copies seem to be readily available on the internet.
2 From the Instrument side: The RS-232 standard
In order to understand the very confusing terminology and wiring conventions associated with serial port connections, it may be helpful to start with a bit of background. The RS-232 standard was originally intended to be used for a quite specific purpose, communication between computers or terminals and communications devices (like modems), which would then be connected by some other means (e.g. a telephone line) with another communications device. A typical arrangement might look like:

The computer or terminal is described as "data terminal equipment" (DTE) and the modem is "data communications equipment" (DCE). Much of the confusion over serial connections comes from the fact that RS-232 has been used for lots of things that don't really fall into either the DTE or DCE class, like spectrophotometers or other instruments. Some manufacturers treat the instrument as a DTE and others as DCE.
The original RS-232 standard specified that the cable should have 25 conductors, but did not specify the mechanical connectors. Later versions specified the DB-25 connector, which has 25 pins in two rows, numbered as shown below (as viewed from the male connector):

Of the 25 pins, 22 have assigned functions in the official specification. But, most of these are very rarely used in modern equipment. The pins that are commonly used are:
Pin Function Abbreviation
1 Cable ground (shield) - 2 Transmit data TX 3 Receive data RX 4 Request to send RTS 5 Clear to send CTS 6 DCE ready DSR 7 Signal ground GND 8 Carrier detect CD 20 Data terminal ready DTR 22 Ring indicator RI
The other connector that is commonly used for serial connections is the DB9, a smaller version with only 9 pins. The standard RS-232 connections on the pins of a DB9 connector are shown below. For the rest of this discussion, though, we will refer to the DB25 pins to avoid at least one source of confusion.
There are two very important (and seemingly contradictory) conventions to keep in mind:
- The same function ids are used for both DTE devices and DCE devices. Thus Pin 2 on both devices is "Transmit data".
- The function names refer to the functions of the DTE device, not the DCE. Thus, pin (or socket) 2 on the DCE device is labeled "Transmit data", but its function on that device is to receive data. Some manufacturers try to clarify this issue by using the seemingly more sensible designation "Receive data" for Pin 2 on a DCE device. But, since this is not universal, the designations become almost useless.
With those things in mind, we can consider what the different wires in the cable do. The three most important wires (pins) are:
- Pin 2: TX - Carries data from the DTE device to the DCE device.
- Pin 3: RX - Carries data from the DCE device to the DTE device.
- Pin 7: GND - All of the signals are expressed as a voltage relative to this pin.
- A DTE device sends data on Pin 2 and receives data on Pin 3.
- A DCE device sends data on Pin 3 and receives data on Pin 2.
All of the other pins have roles in "hardware handshaking", i.e. allowing the two devices to tell each other when it is OK to transfer data. Two of these carryout an exchange of information:
- Pin 4: RTS - Carries a signal from the DTE device to the DCE device requesting permission to send data. This signal may be required to activate the DCE to receive data.
- Pin 5: CTS - Carries a signal, in response to the RTS signal, from the DCE device back to the DTE device indicating that the DCE is ready to receive data.
Two additional pins are used to convey the status of the DCE and DTE to one another without being asked:
- Pin 6: DSR - Carries a signal from the DCE device indicating that it is ready to receive data. It is generally used to indicate that the DCE device has power and is ready to go.
- Pin 20: DTR - Carries a signal from the DTE device to the DCE device indicating that it is powered and ready.
The last two pins listed in the table above are intended to carry information that is specific to a modem connection:
- Pin 8: CD - Also called "data carrier detect" (DCD) or "received line signal detector". When used with a modem it is meant to indicate that a connection to a remote modem has been established.
- Pin 22: RI - Carries a signal from a modem to a DTE device when the modem receives a ring signal on the telephone line. This pin is rarely used.
Although the manufacturers of an instrument may say that it has an RS-232 port, it is quite likely that it won't use all of the handshaking connections, and it may use them in a non-standard way. This is often the most confusing part of establishing a connection.
3 Signals, logic and voltages
In the above discussion, the nature of the signals sent between the devices was left rather vague. The most obvious convention would be that a positive voltage (relative to the ground wire) indicates a logical "true" on a handshaking connection and a binary 1 on a data line (TX or RX). As it happens, the first of these is true and the second isn't.
For both data and handshaking, there are two states defined by positive or negative voltages. In this context, a transmitted positive signal should have a voltage between +5 and +15 V and a negative signal should lie between -5 and -15 V. The signal is undefined if it lies between -5 and +5 V, which shouldn't happen. At the receiving end, the signal will be interpreted as being positive if it lies between +3 and +15 V and negative if it lies between -3 and -15 V. The extra range on the receiving end is meant to provide some tolerance to noise.
For data transmission, a positive voltage is used to indicate a binary 0, and a negative voltage indicates binary 1. The negative voltage is also referred to as a "MARK" and the positive voltage as a "SPACE", terminology that has its origins in telegraph and teletype communications. When the transmit line (TX) is in a resting state, the RS-232 standard specifies that it should have a negative voltage. The receiving pin (RX) should have a zero or slightly positive voltage if it is not connected to another device. This information can be used to determine whether a device is DTE (negative voltage on Pin 2) or DCE (negative voltage on Pin 3).
For the handshaking signals, the convention is reversed: A positive voltage means that the signal is on or "asserted".
4 Null modem cables and adaptors
One of the most common deviations from the RS-232 standard involves connecting two DTE devices together. This might be two computers, or a computer and a peripheral that is wired as a DTE device. Using a standard cable to connect the two devices obviously won't work: The two transmit pins will be connected to each other, the two receive pins will be connected to each other, etc. Cables designed to deal with this problem are called "null modem" cables. There are actually a variety of null modem cables, which deal with the handshaking problem in different ways, some of which are described below. These examples offer some insights into the general problem of handshaking and ways of dealing with it.
In the simplest null cable, the two DB25 connectors are wired to connect two DTE devices (A and B) as follows:
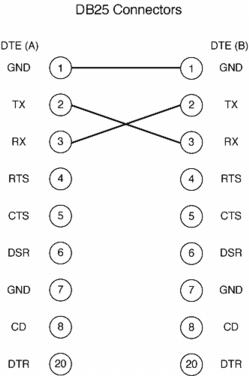
With the two DTE devices connected this way, device A transmits data to the RX Pin of device B, and receives data from the TX Pin of device B. But, there is no hardware mechanism to control the flow of data. If either of the devices requires a handshake signal on one of its pins, this cable won't work. On the other hand, it can work if the devices are both able to accept data without control or if they use compatible software to send signals along the data connections that are interpreted to control the data flow. Software handshaking is often called "XOFF/XON" control for the two characters that are used for control. This type of communication is usually slower than when the data flow is controlled by hardware.
If the devices require the handshaking signals, they can sometimes be tricked by using a more elaborate connection, called a "loop back" cable:
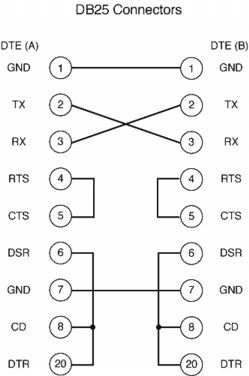
Remember that the properly implemented DTE must set its own RTS and DTR signals on and receive the signals on its CTS and DSR inputs before transmitting. With the arrangement shown above, the DTE that wants to transmit will receive the proper signals because it sends them to itself when it activates its own RTS and DTR signals! The CD input will also receive a signal if that is required. The catch is that there is still no real data flow control between the devices unless it is managed by software.
The most elaborate, and probably most common, null cable is connected like this:
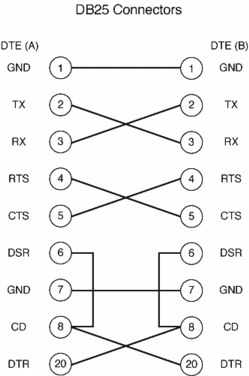
Because the handshaking pins are connected between the two devices, there is at least the potential for hardware control, provided that the two devices treat the connections properly. With this type of connection, the RTS signal of one device, say A, cannot play its usual role of activating the receiver of the other device, since it is now connected to the CTS pin of device B, which would normally be interpreted as an "OK to transmit signal" for B. Instead the RTS and CTS pins are used as generic outputs and inputs to transfer information between the two devices, with the meanings specified by the software. The DTR and DSR pins are available to play a similar role, and the CD pin receives the same information as DSR. The net result is that each device has two pins that it can use to send handshaking signals to the other. With the proper software to control the pin signals, this can allow very fast communication.
In addition to cables wired as described above, there are also small adaptors that can be added to a standard cable to cross the connections. These generally seem to be wired for full handshaking, as in the last example
Unfortunately, the variety of cable connections used to connect serial devices extends way beyond these examples.
5 The Macintosh side: An RS-422 connection
The next thing to come to terms with is the fact that the serial connections on a Macintosh are not RS-232 connections. Instead, they are RS-422 connections. The major difference between the two standards lies in the way that the data signals are encoded electrically. As discussed earlier, the RS-232 signals are expressed as voltages (positive or negative) relative to the ground wire (Pin 7 in a DB25 connector). Thus, one wire is needed for TX and one for RX. For RS-422, TX and RX each get two wires, and the signals are expressed as a voltage difference (positive or negative) between these two wires, rather than a voltage relative to a common ground wire. This arrangement is called a "balanced differential" line and can potentially carry data over longer distances and at higher rates than an unbalanced line as used for RS-232. Some RS-422 connections do not include hardware handshaking, but the Macintosh implementation has three pins for this purpose.
Except for the very earliest models, Macs use a small circular connector, the DIN-8, for their serial connections. The male connector (on the cable) looks like this:
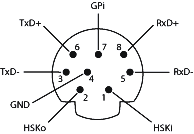
The two data transmit pins are labeled TxD- and TxD+, and the two receive pins are labeled RxD- and RxD+. As before, the functions are defined from the perspective of the computer, i.e. the DTE device. In transmitting data, a binary 1 is represented when TxD- is more negative than TxD+. Binary 0 is indicated by TxD- more positive than TxD+. Signals received on the RxD- and RxD+ lines are interpreted in the same way. These voltage conventions make the TxD- and RxD- pins roughly equivalent to TX and RX, respectively, in the RS-232 standard.
There are three handshaking pins: HSKo, HSKi and GPi. The lower case o and i in the designations indicate whether the pins are outputs or inputs, respectively, for the computer.
The way in which Apple intended for the various pins to be used in conjunction with an RS-232 device can be deduced from their specification for a cable to connect the Mac to a modem, i.e. to a DCE device.
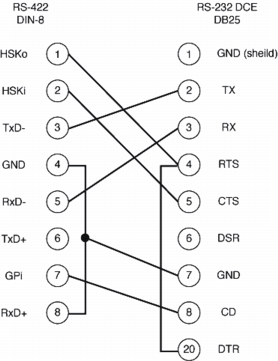
This cable is commonly referred to as a "hardware handshaking cable". In this arrangement, the TxD+ pin is not used, which is OK because the RS-232 device will detect incoming signals on the basis of the voltage difference between TX and ground. On the other hand, the Mac needs to measure the voltage between its RxD- and RxD+ pins, so the RxD+ pin is connected to the RS-232 ground.
For the modem connection, the handshaking works as follows: Before the DCE modem can receive signals, it needs positive signals on its RTS and DTR pins, which are provided by the HSKo pin of the computer. The modem can signal the computer that it is ready to receive by sending a signal from its CTS and CD pins to the computer's HSKi and GPi pins, respectively. Notice that the DSR pin of the modem is not used.
The software on the computer, of course, has to use the handshaking pins appropriately. Most Mac serial port software, including terminal emulators and MacSpec II, has options to turn on and off "CTS" and "DTR" handshaking, either together or independently. According to Jim Conners, CTS and DTR correspond to the HSKi and HSKo pins, respectively, which is how they are connected in the standard cable illustrated above. When CTS is activated, the Mac monitors the HSKi pin and sends data only when it has a positive voltage. When, DTR is activated, the computer will set the voltage on its HSKo pin positive when it is ready to receive data. Hopefully, the peripheral is checking this voltage so that it will send data only when it is positive. Apparently, the GPi pin is not monitored by most software.
6 Connections to three spectrophotometers
So far, we have managed to make MacSpec II work with three spectrophotometers: The Spectronic 2001, the Pharmacia-LKB Ultrospec III and the Spectronic Genesys 8. This required incorporating the command set for each spectrophotometer into the MacSpec code and establishing a hardware connection. The hardware connections and their rationales are described here, in order of increasing complexity.
6.1 UltroSpec III
This spectrophotometer has a DB25 connector, and the manufacturer provided the following information:
Pin No. Signal Title Function
1 Shield Cable Shielding 2 Receive Data Data from computer 3 Transmit Data Data to computer 4 Clear to send Hand shake from computer 5 Ready to send Handshake to computer 6 Data terminal ready Handshake to computer 7 Ground Ground
The "Function" column in this table is especially helpful, because it explains what is really going on. Since data is being received from the computer on Pin 2 and sent to the computer on Pin 3, this must be a DCE device. (See above.) In this case, using the standard hardware handshaking cable works perfectly. With this cable, the handshaking signal from the HSKo pin of the computer goes to Pin 4 of the spectrophotometer (as well as Pin 20, which apparently isn't used), and the handshake signal from Pin 5 of the spectrophotometer goes to the HSKi pin of the computer. The signal from Pin 6 of the spectrophotometer isn't connected to the computer at all, but this signal is presumably redundant.
Notice that the labels given in the "Signal Title" column don't actually follow the usual convention of defining the functions in terms of the DTE device. Instead, the manufacturer defines them in terms of the spectrophotometer, which makes sense if this what you expect . . .
6.2 Spectronic 2001
This instrument also uses a DB25 connector and comes with the following information:
Pin Signal Name Function
1 GND Chassis ground 2 Transmit Data Data out from 1001 3 Receive Data Data in from external device 4 Request to Send 1001 Supplies ±12V 5 Clear to Send Requires ±3 to ±25 V from external device 6 Data Set Ready Requires ±3 to ±25 V from external device 7 Signal/Ground Return for data and control signals 20 Data Terminal Ready 1001 Supplies ±12V when power on
This matches the specification for a DTE device, except for Pin 8 which would normally be used for the carrier detect signal from a modem. A simple test showed that the hardware handshaking cable connected to a null modem adaptor gives a working connection. This combination leads to the following connections between the Mac and the spectrophotometer:
DIN-8 Pin Mac Function DB25 Pins DTE functions
1 HSKo 5, 6, 8 CTS,DSR 2 HSKi 4 RTS 3 TxD- 3 RX 4 GND 7 GND 5 RxD- 2 TX 6 TxD+ none none 7 GPi 20 DTR 8 RxD+ 7 GND
Thus, the HSKo signal from the Mac satisfies the spectrophotometers requirements for handshaking signals on on pins 5 and 6, and the signals from Pins 4 and 20 of the spectrophotometer are fed to the HSKi and GPi pins of the Mac. (Likely, the signal on the GPi pin is ignored.)
6.3 Spectronic Genesys 8
The hardware interface for this instrument proved more difficult to decode than the others. (In fact, this is the instrument that drove me to try to understand all of this stuff!) The manufacturer was not able to provide a list of the pin functions, but does specify a cable for connecting the instrument to a PC. The spectrophotometer uses a DB9 connection, and the cable has DB9 connectors at each end. But for consistency with the discussion above, I have "translated" the DB9 connections to the equivalent DB25 pins. The DB25 equivalent of the specified cable is shown below:
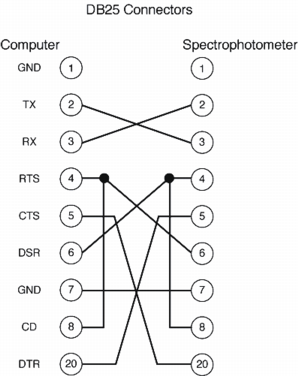
Although we don't really know what is on the spectrophotometer side of this cable, presumably the designers assumed that the computer would have the standard RS-232 connections. The first thing that we can deduce is that the spectrophotometer is a DTE device, since the RX and TX connections are crossed in the cable. We can also figure out two of the handshaking connections. Pin 20 on the computer is the DTR connection which sends a signal. Therefore, Pin 5 on the spectrophotometer must be an input for a signal. Since Pin 5 on the computer is an input (CTS), Pin 20 on the spectrophotometer must be an output.
The confusing part of this connection involves Pins 4 and 8 on each side. It isn't entirely clear why these two pins are connected on each side. It may be that they only have to be connected on one side and that the designer connected them on both sides simply to make the cable symmetrical, so that it could be used in either orientation. On the computer side, it is possible that the designer wants to make sure that Pin 8 (CD) gets a signal whenever Pin 4 (RTS) is activated. That Pin 4 on the computer is an output also implies that Pin 6 on the spectrophotometer is an input. Shifting to the pins that are connected together on the spectrophotometer side (4 and 8), these are also connected to the DSR pin on the computer, an input. Thus, it seems likely that 4 or 8 on the spectrophotometer is an output, with the other pin being an input that is to be activated by the spectrophotometer itself. But, as noted above, the two pins might be just connected together for symmetry, and one may not be used at all. To summarize, we can deduce the following about the functions of the pins on the spectrophotometer:
Pin Function
2 Transmit data to computer 3 Receive data from computer 4 Input, output or possibly null 5 Input from computer 6 Input from computer 7 Signal ground 8 Input, output or possibly null 20 Output to computer
To make and test connections between this spectrophotometer and a Mac, I used the following pieces of hardware:
- Standard Macintosh hardware handshaking cable, with male DIN-8 connector on one end, for the computer, and a male DB25 connector on the other end.
- A Serial Jumper Box with DB25 connectors (Part no. 276-1403 from RadioShack). This is simply a small box with two DB25 connectors (one male and one female) and provisions to wire the pins together in any combination. The connections are made by soldering jumper wires to a printed circuit board.
- A cable with a male DB25 connector on one end and a female DB9 on the other (to fit the spectrophotometer), wired as described below.
- A male-to-female "gender changer" that allows the jumper box to be connected to both cables.
After all of this is connected together, the easiest way to think about it is to consider the two sides of the jumper box as extensions of the pins on the computer and spectrophotometer. With the numbers representing the DB25 connectors on the jumper box, what we know about the two sides can be summarized as:
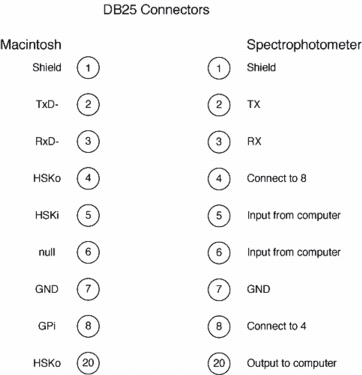
A starting set of connections would look like:
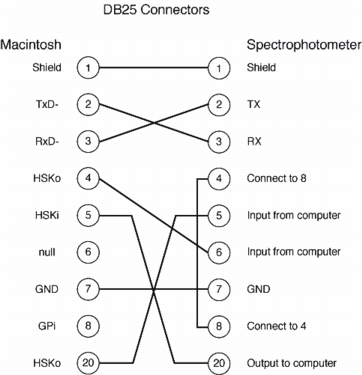
Some additional jumpers can be added to make the connector symmetrical:
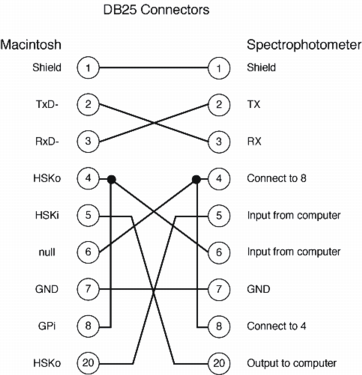
These additions are not likely to have any functional consequences. Pin 6 on the computer side is not connected to anything, and Pin 8 on the computer side is the GPi pin, which is an input but is not usually needed. Notice that this set of connections is exactly like the ones specified in the manufacturer's cable!
Unfortunately, this set of connections didn't work reliably. However, adding one more jumper to the adaptor, connecting Pin 8 on one side to Pin 8 on the other, did the trick. The final adaptor is wired like this:
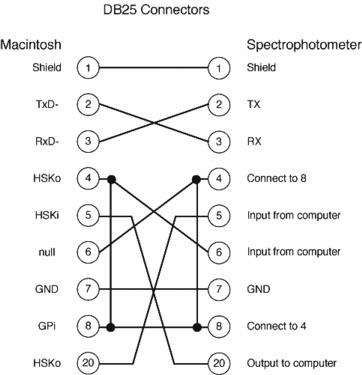
This results in lots of pins being connected together: Pins 4, 6 and 8 on each side are all tied together. I'm not sure exactly why this works, but it seems likely that Pin 4 or 8 on the spectrophotometer side needs a handshaking signal from the computer side.
7 DB9 connectors
Often, on both computers and peripherals, the DB25 connector is replaced with a 9-pin connector, the DB9. The pins on this connector are labeled as shown below (as viewed from the male connector):

This connector is sometimes referred to as an "AT" serial connector because it was used on IBM PC/AT computers and many subsequent PCs. On computers, at least, it is generally wired as follows:
Pin Function DB25 Equivalent Pin
1 CD 8 2 RX 3 3 TX 2 4 DTR 20 5 GND 7 6 DSR 6 7 RTS 4 8 CTS 5 9 RI 22
8 Contact Information
David P. Goldenberg
Department of Biology
University of Utah
257 South 1400 East
Salt Lake City, UT 84112-0840
goldenberg@biology.utah.edu
File translated from TEX by TTH, version 3.05.
On 2 Jan 2003, 22:09.